It was the creativity bit that I was really thinking about when I was updating my Etsy page. My little girl, Emily, wants to be a writer. She loves words and the stories that can be conveyed. I hope this enthusiasm lasts. I have acquired this creativity bug. I'm not sure when it arrived but like a lot of people, I was taught to knit by my Mum who patiently used to pick up my stitches when I didn't have a clue how to resurrect my struggling creation. I still don't know how to pick up stitches and so knitting for me is a bit like tightrope walking without a net. How I miss my Mum!!! I also remember those knitting dolly 'toys' whereby you made a long, thin knitted 'sausage' but also remember that no one really had a clue what to do with the 'sausage' after it had been created. Any ideas on a postcard.... (or post me a link below)!
I now have a love of cooking, sewing and screen printing which I mentioned earlier. I started off my screen printing obsession with the purchase of a gocco from Japan. Infact, I loved it so much I couldn't bring myself to use it for ages. I'd take it religiously out of the box, look at all the components and then put it away again, waiting for a special day when it would be the right time to start the gocco printing.
I sold it in the end because I couldn't master the technique to produce quality prints. I was quite happy to let it go to someone else who could maybe create masterpieces. I then moved on to screen printing using large aluminium screens. Apparently whenever I say 'screen printing' I move my hands down as if I am pulling a screen. I hadn't really noticed until it was pointed out by my friend, Suzanne, from work!! I was trying to explain to another friend what screen printing actually is and to be honest I don't think I was very clear at all...so I thought I'd have a go now with the help of some pictures.
Obviously there needs to be a screen involved with different mesh according to the detail required in the final print. The higher the mesh count the more detail the finished image will have. The screen is then covered in certain areas to allow the ink/paint to go through in the area left unblocked. This can be done using several different methods.
One method is to paint the mesh in the areas you don't want the ink to pass through. This way the area left unpainted is the image which will go onto the paper, card or fabric.
This is good for large images and is great as it is easy to create at home.
Another method is to use a paper stencil. Again, this is more difficult if the pattern or image is intricate but is great in that it can easily be completed at home. The stencil is not permanent yet weakens every time an print is made.
It is fastened to the back of the screen and then ink applied to the other side and the squeegee dragged across the screen.
My favourite method is to use photo emulsion. A screen is coated with the emulsion; this needs to be done in a dark area as it is light sensitive. This is then left to dry and then you use light to expose an image onto the screen to make a stencil. The photo emulsion hardens where light hits it and will wash away where light doesn't hit it (leaving an image behind).
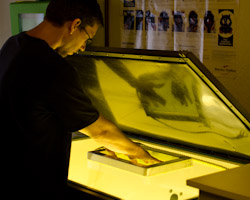
The image is placed on the light exposure unit with the coated screen on top. This is the 'set' by allowing light to be directed onto the screen.
Here the light exposure unit is being used to 'set' the image onto the screen.
The screen is then blasted with pressurised water to remove the emulsion and leave the stencil on the screen.
A squeegee is then used to drag the paint across the screen and print the image.
Here's my set up at home so that I don't have to go to the studio every time.
And here's some of the prints created in the studio and at home.


